About the John Muir Trail

country
United States
length
339 km(211 mi)
Type of trail
Long-distance
difficulty

Difficulty is highly personal. Be aware of the weather conditions as bad weather turns easier trails in difficult trails especially in the mountains.

Difficult
accommodation

Lodging means a mix of hotels, hostels or AirBnB’s.

Wild camping
Elevation gain
14000 m(45932 ft)
terrain
Mountains, Forest, Hills
remoteness
All the time
Show more

The John Muir Trail (JMT) is the ultimate way to experience the beauty of the Sierra Nevada, offering a 340-kilometer (211-mile) journey from Yosemite Valley to the summit of Mount Whitney, the highest peak in the continental U.S. Granite peaks, crystal-blue alpine lakes, and meadows bursting with wildflowers make this range one of the most stunning in North America.

The JMT goes through three iconic American national parks: Yosemite, Kings Canyon, and Sequoia, with elevations ranging from 1,200 meters to over 4,400 meters. Despite the remote terrain and wild feel, the trail is surprisingly easy to follow.

Maaike profile picture

Maaike van den Ende

Maaike is a passionate hiker and outdoor enthusiast from the Netherlands. She completed the John Muir Trail solo in the summer of 2022—her first solo thru-hike, and a truly wild adventure. From unpredictable weather and remote terrain to tricky river crossings, the trail tested her in every way. Along the journey, she also discovered the warm and social nature of American hiking culture.

Since then, Maaike has continued to chase long-distance trails, including the Grande Traversée des Alpes (640 km) in 2021 and 2023, and the Nordkalottleden in 2024. You can follow her adventures on Instagram: @Maaike.to.the.End

View profile

The Trail

The trail starts (or ends) in Yosemite Valley, where you will be surrounded by dramatic cliffs and waterfalls. Soon, you’ll climb into alpine country, leaving behind the crowds and entering a quiet wilderness filled with granite ridgelines and glassy lakes.

One of the magical things about the JMT is its rhythm: hike through a forested valley, climb a dramatic mountain pass, descend into another valley, and repeat. Each pass has a new view, different light, different colors, and a different feeling of being absolutely tiny in a landscape that stretches beyond comprehension.

As you move south, the peaks grow taller and more dramatic. Evolution Basin, Muir Pass, Guitar Lake—each day brings another jaw-dropping moment. Finally, the trail ends (or starts) with a climb up Mount Whitney (4,421 meters). Whitney is the highest peak in the contiguous United States, which makes it a bucketlist hike of its own!

American backpacking culture is incredibly friendly and open. Hikers chat at campsites and trade stories over dehydrated meals. Even though you’re deep in the wilderness, you rarely feel alone in the summer; there’s a warm, communal spirit that makes the journey even more meaningful.

While the JMT crosses high passes and wild terrain, it’s not a technical trail. You don’t need to be an elite mountaineer to do it. With decent fitness and preparation, most people find the trail physically demanding but totally doable. There’s no climbing or scrambling involved, and the footpath is well-trodden and easy to follow.

Camping is entirely wild. There are no huts, but plenty of stunning campsites beneath the stars. And yes, bear canisters are required (and absolutely necessary), but with a little care and good planning, wildlife encounters are mostly just a treat for the eyes.

Stages

The trail can be hiked from either north to south (SOBO) or south to north (NOBO). There are no official stages; you can adapt them to your preference:

Example 13-day itinerary of the JMT

Stage 1:

Happy Isles – Toulumne Mariposa County line, 26.7 km | 16.6 mi

Stage 2:

Toulumne – Mariposa County Line – Donohue Pass, 28.8 km | 17.9 mi

Stage 3:

Donohue Pass – Island Pass, 8.2 km | 5.1 mi

Stage 4:

Island Pass – Madera-Fresno County Line, 36.7 km | 22.8 mi

Stage 5:

Madera – Fresno County Line – Silver Pass, 28.5 km | 17.7 mi

Stage 6:

Silver Pass – Selden Pass, 32.2 km | 20 mi

Stage 7:

Selden Pass – Muir Pass, 44.1 km | 27.4 mi

Stage 8:

Muir Pass – Mather Pass, 35.4 km | 22 mi

Stage 9:

Mather Pass – Pinchot Pass, 15.9 km | 9.9 mi

Stage 10:

Pinchot Pass – Glen Pass, 26.2 km | 16.3 mi

Stage 11:

Glen Pass – Forester Pass, 19.3 km | 12 mi

Stage 12:

Forester Pass – Trail Crest, 37.3 km | 23.2 mi

Stage 13:

Trail Crest – Whitney Portal, 13.4 km | 8.3 mi

Accommodations

Wild camping is the only option on the John Muir Trail. There are no huts or shelters along the way. While the freedom to camp nearly anywhere is part of the trail’s appeal, there are important restrictions to follow. Generally, you should camp at least 100 feet away from both the trail and water sources, and never on fragile vegetation, especially meadows. This rule is strictly enforced in Yosemite National Park, Inyo National Forest, and Sierra National Forest. In Kings Canyon and Sequoia National Parks, the 100-foot rule is a recommendation, but the minimum requirement is to camp at least 25 feet from water and the trail.

Throughout the trail, you’ll come across many well-used campsites that don’t meet the full 100-foot distance. According to wilderness rangers, as long as these sites aren’t marked with signs like “no camping” or “restoration area,” it’s better to use an existing site than to create a new one and risk further impact.

A bear canister is mandatory on the JMT. All your scented items, like food, trash, and toiletries, must be stored inside it. At night, place your canister at least 100 feet downwind from your tent, ideally in a spot where it won’t roll away if a bear nudges it (like nestled between rocks or under a tree trunk). Never store food inside your tent or backpack, even for a short time. Sierra bears are smart and persistent!

Read more about finding a great campsite and the Leave No Trace principle on the PCT website here.

Best time of the year

The best time to hike the John Muir Trail is during the summer months, from July through September. While PCT thru-hikers often begin crossing the Sierra as early as late May or June, JMT hikers should time their start based on snow conditions. In low-snow (drought) years, the trail may be accessible by mid-June, but in heavy snow years, it may not fully open up until mid to late July. Even in summer, north- and east-facing slopes at higher elevations can hold snowbanks well into the season.

Be especially cautious of afternoon thunderstorms. Lightning is one of the most serious hazards on the trail, and storms can develop rapidly in the mountains.

Wildfires are another major concern during the summer months. Fires can lead to trail closures, poor air quality, and dangerous conditions. Always check current fire updates and air quality reports before and during your hike, and have a backup plan in case your route needs to change.

Safety & Gear

Planning your resupply points is one of the most important steps in preparing for a successful JMT thru-hike. Knowing what each stop offers and arranging your resupply boxes in advance makes your journey through the Sierra Nevada much smoother and more enjoyable. Always double-check the operational dates and logistics for each resupply location before your trip, as services can vary seasonally.

Resupply

Here’s a breakdown of the key resupply stops along the trail:

  1. Tuolumne Meadows
    Southbound Mile 23 / Northbound Mile 187
    Located in Yosemite National Park, this stop has a post office and a small camp store. It’s a good place to grab fresh snacks, drinks, and a few vegetables.
  2. Red’s Meadow & Mammoth Lakes
    Southbound Mile 60 / Northbound Mile 150
    Red’s Meadow offers basic resupply options and easy shuttle access to Mammoth Lakes, which has full-service grocery stores, outdoor gear shops, and restaurants. There are also hiker boxes at Red’s Meadow. A very popular and convenient resupply stop.
  3. Vermilion Valley Resort (VVR)
    Southbound Mile 88 / Northbound Mile 122
    VVR is a classic JMT resupply point, accessible via a ferry ride or hike from the trail. They offer hot meals, lodging, hiker boxes, and a small store. You can send a resupply package here, but make sure to plan it well in advance.
  4. Muir Trail Ranch (MTR)
    Southbound Mile 106 / Northbound Mile 104
    MTR is known for its expensive resupply service and lack of a food store. If possible, try to skip sending a package here. However, the hiker boxes are often well-stocked, so it’s worth a quick stop to grab extras before pushing into the more remote southern stretch.
  5. Kearsarge Pass / Onion Valley
    Southbound Mile 180 / Northbound Mile 30
    A popular exit point to access the town of Independence via hitchhiking. There’s no major store in town, so send a resupply package to a local lodging option or post office.

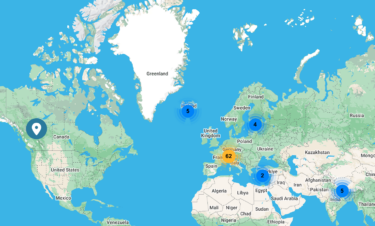
More information about the resupply points here.  

It is recommended, if you have the time, to travel to the JMT a few days early on a flight to San Francisco. Then, stay a few days in Mammoth Lake, recovering from jetlag and shopping (nice little town that has everything), bring a resupply to Reds Meadow, ship one to Independence, and order one for VVR (you can also easily buy things there). Take the bus to Lone Pine to start and then finish in Yosemite, from which it is easy to go back to San Francisco with public transport.

Gear

Be prepared for a wide range of weather conditions with standard backpacking gear. Much of the John Muir Trail is exposed, so sun protection is essential. Think high SPF sunscreen, a sun hoody, a hat, and even an umbrella for extra shade during the hot Californian summer.

If you plan to camp at higher elevations, keep in mind that the terrain can be very rocky. A freestanding tent will make setting up camp much easier.

Don’t forget your map and compass and bring an emergency beacon as there is no cell reception on most parts of the trail.

Good to know

Recommended in case you are travelling from overseas:

  1. Rent and buy items: You can rent items like a bear canister and Garmin Inreach, for example, at REI. I found the shops very out of stock, and it requires a lot of time to shop in big cities. Do order before and get it delivered to your first accommodation.
  2. Pack your bear canister: Unpacking and packing the bear canister takes a lot of time at the campsite. A pro tip is to put the food for the last day at the bottom and the food for the first day at the top.
  3. Get free food from hiker boxes: Many hikers bring and send more food than they need. Therefore, at all popular resupply spots, MTR, VVR, and Reds, the hikers’ boxes are filled with free food.
  4. Download an offline converting app: Download a converting offline app like “Units Plus.” A conversation with another hiker will usually go like: that time when I hiked X miles, so many X elevation, with so many X lbs, and the temperature was X Fahrenheit…
  5. Bring photos from home: 8/10 of the people I met didn’t know the Netherlands, and I heard so many misassumptions (the classics and beyond). It was too bad I just had a new phone and couldn’t show pictures, so many people were curious about “backpacking” and the climate in the Netherlands.
route
point-to-point
highest point
4.421m (14.505 ft)

Want to submit a trail or make this page more complete?

Always read the disclaimer

Terms of Use: important to all visitors on this website. We strive to publish high quality content and information on this website. However it’s always possible that we’re missing out on some crucial information. In spite of the fact that this route, associated GPS track (GPX and maps) were prepared under diligent research by the specified contributor and/or contributors, the accuracy of such and judgement of the author is not guaranteed. Therefore, hiking-trails.com and contributors are in no way liable for personal injury, damage to personal property, or any other such situation that might happen to individuals hiking or following this route. Should you choose to hike this trail, this is always at your own risk. Check out our guidelines for safety hiking and Leave No Trace principles at the hiking 101 page.

Download GPX

Join the community!

Login or create a FREE account 😊

With an account you can:

Download GPX files

Pin trails to your wishlist

Mark trails as hiked by you

Rate hiking trails

Comment on trails, blogs and gear reviews

Happy trails!
Login

Don't have an account yet? Register here